
The 2:2:2 Bread – An All-Day Easy Whole Grain Bread
Original Posted on by KITCHENR JON 8 Comments

My family eats a lot of bread. A pretty average lunch for my assistants is peanut butter and jelly. Sadly peanut butter is not allowed at the school so there have been some adjustments to the sandwich this fall, but we’re still eating a lot of bread. As much as I love a really chewy and crusty sourdough batard, the boys definitely prefer softer sandwich breads. Thus I decided I needed a go-to recipe that I could memorize and repeat on a weekly basis without much effort. After a month of playing around with recipes I arrived at this one, which I call the 2-2-2 bread. That seems easy to remember, the 2-2-2 bread. Have you remembered it yet? Well you may want to know what all the 2s are referring to….

Here’s the recipe in its most basic form: two cups whole wheat flour (or substitute another whole grain flour like rye, spelt, red fife, etc.), 2 cups all-purpose flour, and 2 cups water! Add a bit of yeast, some salt, a dash of oil and you’re good!


What I like about this recipe is that since it’s easy to remember it’s also easy to tweak in any direction you want. If you like a chewier bread, with larger bubbles just add extra water. If you like it sweeter add some local honey. If you like it even healthier decrease the amount of white flour and replace it with more whole grain. Oh, and the best part is you can control how long it will take by adding more or less yeast! I usually use ½ teaspoon of yeast which allows me to give the bread a leisurely all-day rising, but if I’m in a hurry the bread can be ready to eat in just over 2 hours using a full 2 ¼ teaspoons of yeast. And while I’m mentioning yeast, it should be noted that I only use instant yeast NOT active dry yeast. Instant yeast does not need to be hydrated, it can be added straight to the flour and always works consistently for me. If your grocery store doesn’t carry it try a specialty grocer, they likely will, and it may look like this.

The 2-2-2 Bread: Keep in mind that this recipe can be increased or decreased, just use the ratios 2:2:2 (or more obviously, 1:1:1) and a bit more or less of the other ingredients.
- 2 cups whole grain flour
- 2 cups all-purpose flour
- 2 cups water
- ½ tsp. instant yeast (or more if you’d prefer it to rise more quickly)
- 1 Tbs. oil (or softened butter)
- 1 ½ tsp. salt mixed with 1 Tbs. hot water
Measure the whole grain flour and mix with the yeast in a bowl (or see the variation below). Add the water, mix, and then slowly add the all-purpose flour (you may not need all of it). Form a slightly sticky dough and add the oil. Continue mixing. If the dough is thick enough you can briefly knead the dough (the consistency will depend on your whole grain flour, some absorb more water than others). Mix or knead for 1-2 minutes, giving the gluten in the flour time to develop. Leave the dough in the bowl and cover with a towel or plastic grocery bag. Set a timer for 30 minutes and mix the salt with the hot water.

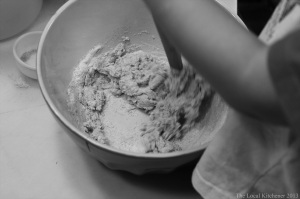

Notice that the dough is still fairly wet and sticky. That’s fine.
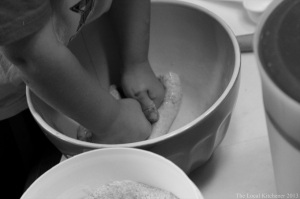
After 30 minutes add the salt water (some salt may not be dissolved which is okay) and work it into the dough gently with your hands by slowly stretching and folding the dough over on itself. Surprisingly adding salt water at this point will seem to make the dough less sticky. When the salt water seems to be incorporated form the dough into a ball and cover the bowl again.

Set the timer for 30 minutes again and then stretch and fold the dough 4-6 times, by gently pulling one side of the dough and folding it over itself, then pulling another side and folding it, and repeating. Form the dough once more into a ball, cover, and set the timer for 30 minutes. Repeat the 4-6 stretch-n-folds, form a ball, cover, and wait another 30 minutes. At this point check the bread. If it seems like it shows plenty of signs of leavening from the yeast then leave it alone. If not then wait 30 minutes and give it another round of stretching and folding (4-6 times). Leave it formed as a ball for about an hour at which point it needs to be shaped for a bread pan (or into a free form loaf, like a batard or boule).
To shape for a loaf pan flatten the ball of dough gently, then roll it up by folding it onto itself, starting with the far side folded to the middle, then the side closest to you, folded to the middle, and finally the whole thing folded one more time. This folding serves to create surface tension that will help the dough rise with more structure. Place the dough into the loaf pan with the seam down. Gently push the dough to fill the space of the pan, trying not to deflate it. At this point you have two options: you can leave it at room temperature to rise which may take about 1-2 hours or you can place it in the fridge for a delayed fermentation which will help the dough develop more flavor. This is my preference because it allows me to make the bread in the morning or even the night before and then bake it the following afternoon. Remove the dough from the fridge about 1 hour before baking.
Preheat the oven to 450. Score the bread with a shallow (1cm) cut down the center right before placing in the oven. Lower the oven temperature to 400 after putting the bread in and set a timer for 20 minutes. After 20 minutes rotate the bread pan and set the timer for 15 more minutes. Check the bread to see if it’s done. The easiest way is to stick a thermometer into the bread. If it is 200 or hotter the loaf is done and can be removed and allowed to cool on a rack. If not set the timer for another 5-8 minutes after which it should be done. Always allow the bread to cool for a least 30 minutes before eating which will ensure that it has had time for the flavor to continue to develop and it will slice more cleanly rather than being slightly gummy.

My young assistant went for a more “free-form” loaf than mine.
Variation: Peter Reinhart’s “epoxy” method. 1-3 days before you want to bake this bread, mix together the whole grain flour with 1 cup of the water and a dash of salt. Form into a ball and place in a covered container in the fridge. Mix the all-purpose flour, yeast, and the other cup of water and place this in the fridge as well. On baking day remove the two components, chop the dough into 5-10 pieces and mix together, adding the oil and salt (and a bit more yeast is okay at this point). Knead for 1-2 minutes, and continue with the series of stretches and folds from the recipe above.
Note: The reason this recipe is a bit adaptable is because of the limited use of yeast. Using less yeast makes for a longer rising time but also gives the dough less volatility. Most recipes for simple white and whole wheat breads use 5 times as much yeast as this recipe as well as sugar or honey. They have much faster rising times which means keeping track of time is much more important. With this recipe I have the whole day to make the bread, and can work on it in small steps as I have time. At any point in the recipe if I have to go somewhere for more than 45 minutes I just stick the dough in the fridge. When I come back I pick up where I left off, adding time for the dough to warm back up a bit. The most important thing is making sure the dough is ready to bake by doing the finger-poke method: wet a finger and push the dough down gently, about 1 cm. If it springs back up immediately it’s not ready to be baked. If the whole slightly springs back it is ready. If it remains a gaping whole it’s probably over-risen in which case it may need to be re-formed and allowed to rise once more (D’ough!).
